Welcome to the second part on how to implement RBAC in Defender for Endpoint. In the previous post we covered the basics on how to create our groups in Azure AD and configuring the RBAC properties in Defender for Endpoint. If you missed that part, check it out on this link.
In this part we´ll cover how to create your device groups in Defender for Endpoint and align those device groups with our new roles.
We´ll start pretty much where we ended the last post, in the Security Center.
Head to “Settings” and select “Endpoint” in order to get to the Defender for Endpoint settings. From there we´ll head over to the settings for “Device groups”:
Create Device groups
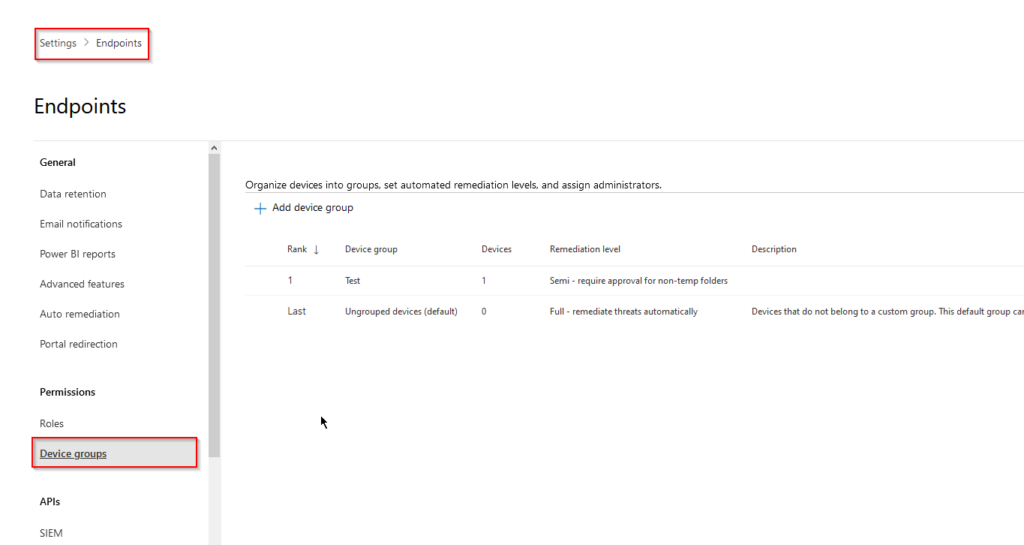
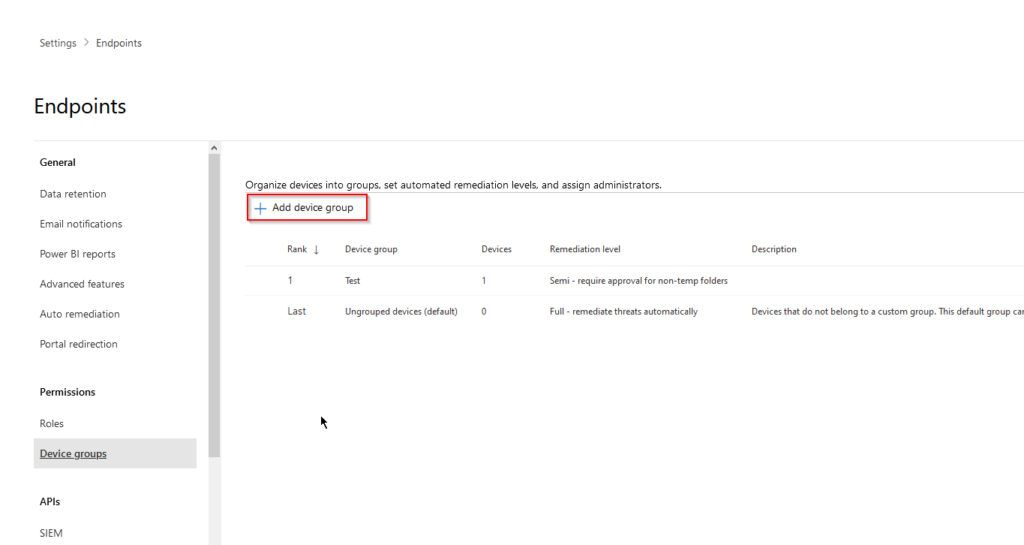
Here, we´ll create a scoped Device group to be able to sort our devices for example according to which subsidiary they belong to, which geographical location they are in etc. Click on the “Add device group” button to start this creation process:
You´ll be greeted by this pop-up blade, asking for a Device group name* (1), an Automation level* (2), and a Description for the group.
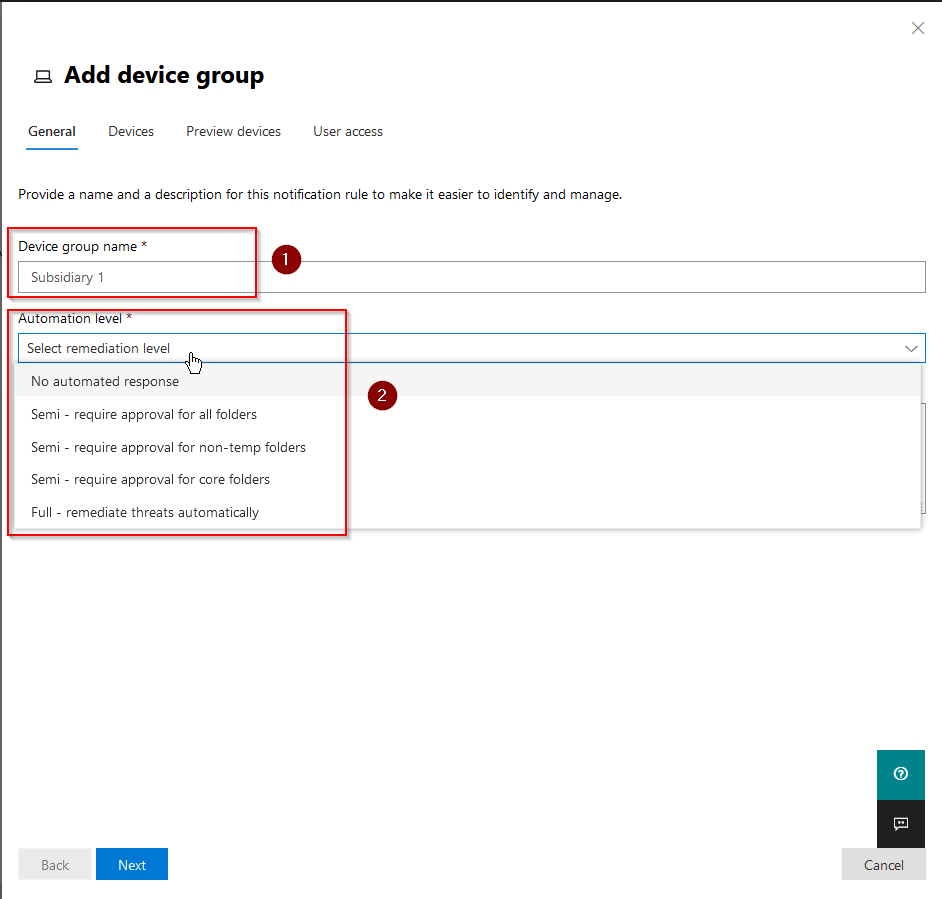
Regarding the Automation levels, if you´re not sure what these are, they are listed below:
| Automation level | Description |
|---|---|
| Full – remediate threats automatically (also referred to as full automation) | With full automation, remediation actions are performed automatically. All remediation actions that are taken can be viewed in the Action Center on the History tab. If necessary, a remediation action can be undone. Full automation is recommended and is selected by default for tenants that were created on or after August 16, 2020 with Microsoft Defender for Endpoint, with no device groups defined yet. |
| Semi – require approval for any remediation (also referred to as semi-automation) | With this level of semi-automation, approval is required for any remediation action. Such pending actions can be viewed and approved in the Action Center, on the Pending tab. This level of semi-automation is selected by default for tenants that were created before August 16, 2020 with Microsoft Defender for Endpoint, with no device groups defined. |
| Semi – require approval for core folders remediation (also a type of semi-automation) | With this level of semi-automation, approval is required for any remediation actions needed on files or executables that are in core folders. Core folders include operating system directories, such as the Windows (\windows\*).Remediation actions can be taken automatically on files or executables that are in other (non-core) folders. Pending actions for files or executables in core folders can be viewed and approved in the Action Center, on the Pending tab. Actions that were taken on files or executables in other folders can be viewed in the Action Center, on the History tab. |
| Semi – require approval for non-temp folders remediation (also a type of semi-automation) | With this level of semi-automation, approval is required for any remediation actions needed on files or executables that are not in temporary folders. Temporary folders can include the following examples: – \users\*\appdata\local\temp\*– \documents and settings\*\local settings\temp\*– \documents and settings\*\local settings\temporary\*– \windows\temp\*– \users\*\downloads\*– \program files\– \program files (x86)\*– \documents and settings\*\users\*Remediation actions can be taken automatically on files or executables that are in temporary folders. Pending actions for files or executables that are not in temporary folders can be viewed and approved in the Action Center, on the Pending tab. Actions that were taken on files or executables in temporary folders can be viewed and approved in the Action Center, on the History tab. |
| No automated response (also referred to as no automation) | With no automation, automated investigation does not run on your organization’s devices. As a result, no remediation actions are taken or pending as a result of automated investigation. However, other threat protection features, such as protection from potentially unwanted applications, can be in effect, depending on how your antivirus and next-generation protection features are configured. Using the no automation option is not recommended, because it reduces the security posture of your organization’s devices. |
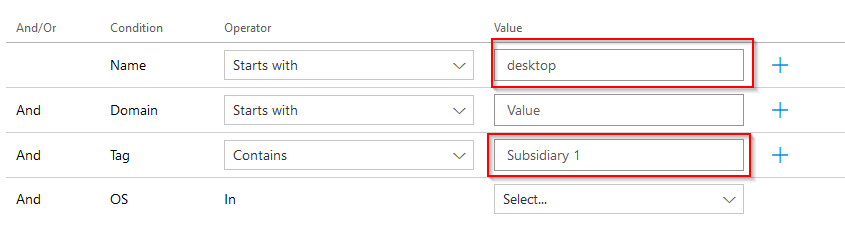
On the next page, we´ll select which devices will be part of this Device group. Here we can select from a number of attributes as well as adding some of our own:
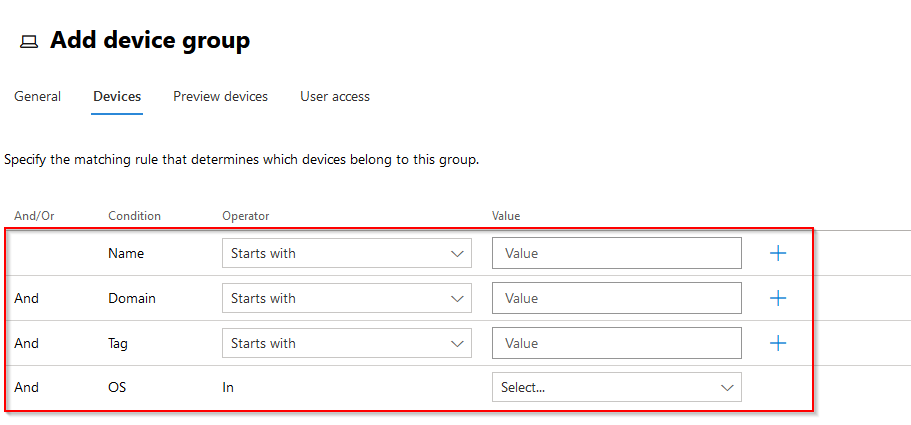
Let´s say that we want to group all Azure AD joined devices from subsidiary 1 into one Device group. The name always begins with “desktop” for this subsidiary and we´ll later create a tag in DfE called “Subsidiary 1”.
Next, on the “User access” blade. We´ll apply our RBAC role for Tier 1 analysts created in the previous post on the device group:

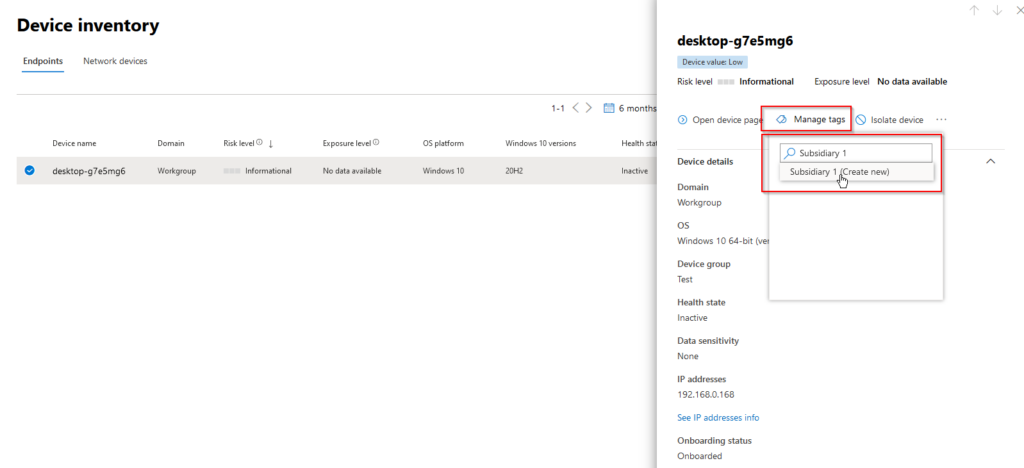
Head back to Device inventory and select one of the devices you wish to tag with “Subsidiary 1” to put the device in the corresponding device group.
Device tagging
Click on the device, click “manage tags” and create your new tag:
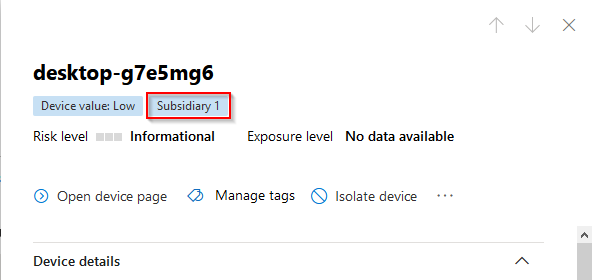
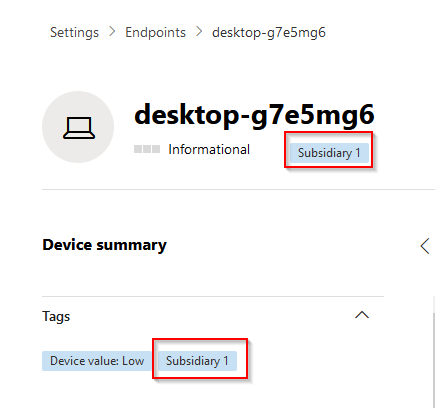
Once you´ve added your tag to the device, this will be shown on the device page:
If we head back to our device group settings, we can now see that Subsidiary 1 contains 1 device. Bear in mind that the evaluation of device groups is based on their rank. If your newly created device group has a lesser rank than a higher ranking device group with a broader scope, the higher ranking one will take precedence.

Of course, adding tags on individual machines using the UI is one way to go, albeit not the smoothest way to go in a large organization. You could instead apply it in the registry of the device under this key:
.
- Registry key:
HKEY_LOCAL_MACHINE\SOFTWARE\Policies\Microsoft\Windows Advanced Threat Protection\DeviceTagging\ - Registry key value (REG_SZ):
Group - Registry key data:
Name of the tag you want to set
.
This action is supported on the following operating systems:
- Windows 10, version 1709 or later
- Windows Server, version 1803 or later
- Windows Server 2016
- Windows Server 2012 R2
- Windows Server 2008 R2 SP1
- Windows 8.1
- Windows 7 SP1
.
For devices managed by your Endpoint Manager infrastructure, you could simply add the registry key in a Powershell script as a Win32 App. This allows you to change it depending on your company needs in a simple manner.
.
The tags also offers the possibility to perform Advanced Hunting querys on the devices tagged as such:
.
DeviceInfo
|where DeviceName contains "desktop"
|where Timestamp > ago(1h)
|where RegistryDeviceTag contains "Subsidiary 1"
|project Timestamp, DeviceName, RegistryDeviceTag, OSPlatform, LoggedOnUsers, MachineGroup
.
When it comes to using the registry for tagging devices, there are sadly a few limitations still:
- Only one Tag name is allowed due to the REG_SZ string type. This limitation could be overcome by the API PowerShell Scripting method on which we will discuss later as an alternative option.
- Tag name should be less than 200 characters.
- Device Tag Name is only synchronized once per day, to apply change and synchronization to Defender for Endpoint Portal, you will need to restart the device and wait for 15-30 minutes for device to appear in Defender portal.
.
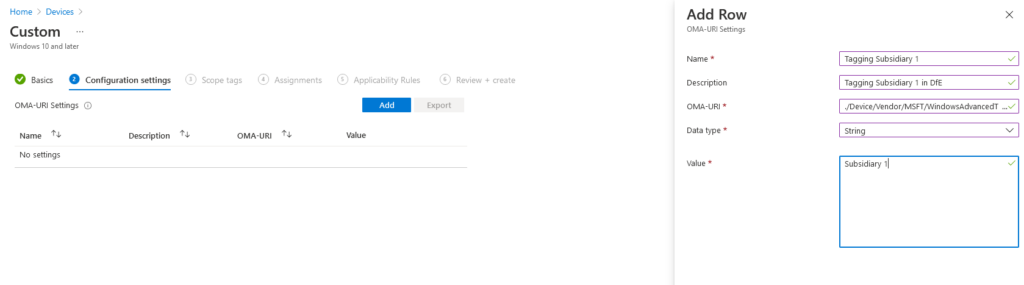
Using Endpoint Manager Configuration Profile to tag devices:
- Create the Custom OMA-URI:
- ./Device/Vendor/MSFT/WindowsAdvancedThreatProtection/DeviceTagging/Group
.
Using Powershell script to tag devices:
Antonio Vasconcelos from Git Hub has provided a script to connect to MD for Endpoint API and tag multiple devices in one shot:
.
# PLEASE NOTE THAT I TAKE NO RESPONSIBILITY ON THE RESULTS THIS SCRIPT MIGHT YIELD
# YOU SHOULD TEST IT AND MAKE SURE IT FITS YOUR NEEDS
# Author: Antonio Vasconcelos
# Twitter: anthonws
# Date/Version/Changelog:
# 2020-01-25 - 1.0 - First release
# Objective:
# Script that adds a specified Tag to machines in MDATP
# Input is expected to be a CSV file with 2 columns, one with "Name" and the other with "Tag". The first line are the headers. Break line for each new entry.
# MachineId is obtained via the ComputerDnsName, which should equate to the Host name or FQDN, depending on the type of machine join (WORKGROUP, Domain, etc.)

$tenantId = '000000000000000000000' ### Paste your own tenant ID here
$appId = '000000000000000000000' ### Paste your own app ID here
$appSecret = '000000000000000000000' ### Paste your own app keys here
$resourceAppIdUri = 'https://api.securitycenter.windows.com'
$oAuthUri = "https://login.windows.net/$TenantId/oauth2/token"
$authBody = [Ordered] @{
    resource = "$resourceAppIdUri"
    client_id = "$appId"
    client_secret = "$appSecret"
    grant_type = 'client_credentials'
}
$authResponse = Invoke-RestMethod -Method Post -Uri $oAuthUri -Body $authBody -ErrorAction Stop
$token = $authResponse.access_token
# Store auth token into header for future use
$headers = @{
        'Content-Type' = 'application/json'
        Accept = 'application/json'
        Authorization = "Bearer $token"
    }
# Clean variables
$Data = @();
$MachineName = $null;
$MachineTag = $null;
$MachineId = $null;
##### CSV input file serialization ####
$Data = Import-Csv -Path c:\Temp\MDATP\MachineList.csv
##### Add Tag Block ####
# Added timer to respect API call limits (100 per minute and 1500 per hour)
# Defaulting to the shortest limit, which is 1500 per hour, which equates to 25 calls per minute
# Introduced a 3 sleep at the beginning of every while iteration
# Iterate over the full array
$Data | foreach {
    Start-Sleep -Seconds 3
    $MachineName = $($_.Name);
    $MachineTag = $($_.Tag);
    # Obtain the MachineId from MDATP, based on the ComputerDnsName present in the CSV file
    $url = "https://api.securitycenter.windows.com/api/machines/$MachineName"
    $webResponse = Invoke-RestMethod -Method Get -Uri $url -Headers $headers -ErrorAction Stop
    $MachineId = $webResponse.id;
    # Body content will carry the tag specified in the CSV file for the given machine
    $body = @{
      "Value"=$MachineTag;
      "Action"="Add";
    }
    # Add specified tag in CSV to the particular MachineId in MDATP
    $url = "https://api.securitycenter.windows.com/api/machines/$MachineId/tags"
    $webResponse = Invoke-WebRequest -Method Post -Uri $url -Headers $headers -Body ($body|ConvertTo-Json) -ContentType "application/json" -ErrorAction Stop
    # Clean variables (sanity check)
    $MachineName = $null;
    $MachineTag = $null;
    $MachineId = $null;
}
.
There is note related to the 3 second sleep time in the script above from the MD for Endpoint Program Team:
– API limits. Due to resource constraints, we limit the amount of API calls that can be made to 100 per minute and 1500 per hour. To avoid this, a sleep value has been applied to the script to put a pause in after each API call. Obviously, this can be removed to speed things up if the number of machines you are modifying does not hit this limit.
.
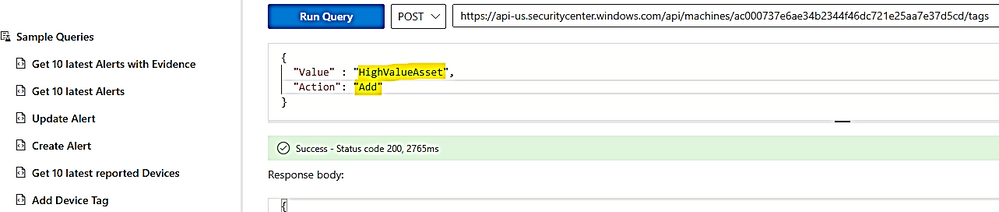
Using Microsoft Defender for Endpoint API Explorer to tag devices.
Let us start with a simple command in API explorer:
- Go to security.microsoft.com, the defender for Endpoint Portal,
- From the left navigation menu, select Partners & APIs > API Explorer.
To add/remove tag by API explorer:
You just need to run the post command as shown here and replace the device ID with your device ID.
- To remove a tag:

- To add a tag:
- To get the list of device ID with Tag:
Run Get command:
https://api-eu/us/uk.securitycenter.windows.com/api/machines?$select=id, computerDnsName,Machinetags

Use Microsoft Power Automate to tag devices:
And that´s it for part 2 of this series. Stay tuned for part 3 🙂
